Test Script for the Evaluation of the EvaML Language and the EvaSIM simulator
FREE AND INFORMED CONSENT TERM
Fluminense Federal University/IC - Institute of Computing
You are being invited to participate in a study to evaluate the EvaML language and the EvaSIM simulator software. This is a research carried out by master's student Marcelo Marques da Rocha, supervised by Professor Dr. Débora Christina Muchaluat Saade.
If you wish to continue participating, continue reading and carry out the proposed activities. Thank you very much!
The robot EVA (Embodied Voice Assistant) is a social robot and was originally developed by researchers at CICESE (Centro de Investigación Científica y de Educación Superior de Ensenada), in Baja California, Mexico. The EVA robot is an open-source robotics platform intended to assist as a support tool for research in Human-Robot Interaction (HRI). The EVA robot image can be seen in Figure 1.

The purpose of this test is the creation of an interactive session for the robot EVA using elements defined in the XML-based EvaML language. The script development process for robot EVA will be used as an evaluation object of the EvaML language. The test will be divided into 3 smaller tasks that will use the language elements progressively. After finishing the 3 tasks, the interactive session should be similar to the available at this link (video language: English). Before starting to perform the suggested tasks, it is recommended to read the EvaML Language Manual and install the EvaML parser and the EvaSIM simulator.
Below are the steps to configure the appropriate environment for the development of the test:
- IDE Visual Studio Code (Linux or Windows)
- XML Language Support by Red Hat installed in VScode
- EvaML parser and the EvaSIM simulator
-
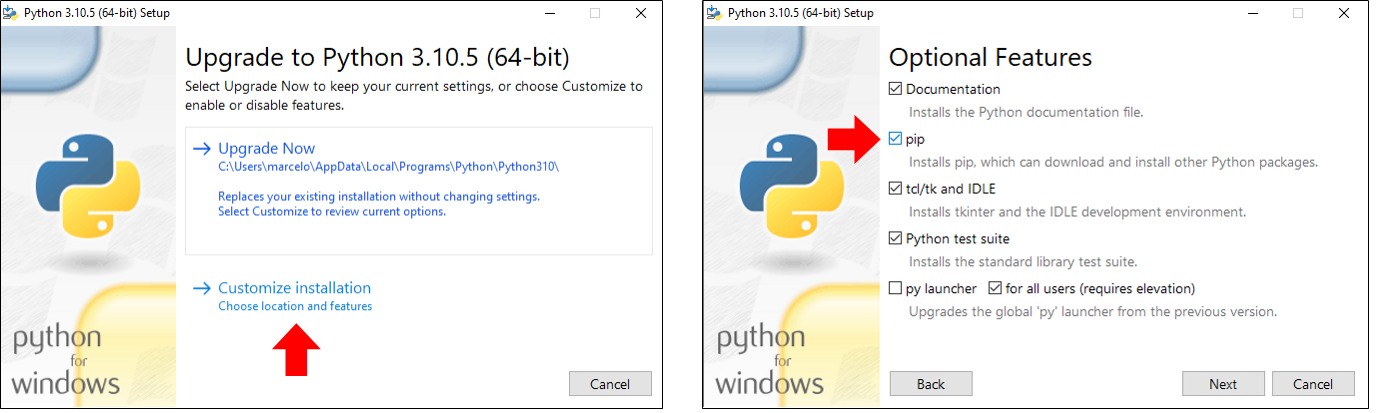
If your operating system is Windows, go to the downloads page and download the version of Python suitable for your operating system through this link. Click on the executable file and follow the installation process. Choose the customizable installation, as indicated in the image on the left in Figure 3, and then make sure that the option pip is selected, as indicated in the image on the right, still in Figure 3. Follow the dialogs displayed and finish the Python installation process.
-
Now you will need to install the Python modules xmlschema and requests, for this, open a terminal in your operating system (Windows or Linux), type and run the following commands: pip install xmlschema (to install the xmlschema module) and pip install requests (for installing the requests module).
-
You must open VSCode and in the "File" menu click on import "folder". Then go to the "eva_sim" folder and select it. VSCode will show the contents of the "eva_sim" folder with all its files. If you are not seeing the directory tree in VSCode, use the shortcut (Ctrl+Shift+E).
-
Looking at the files through the VSCode explorer, you should click on the template file named "my_script_file.xml". This file contains a basic structure of the document in the EvaML standard. It is in this file that you must enter the code referring to the execution of the tasks proposed in this test. You should take advantage of VSCode's autocomplete feature! It will help you to correctly use the language elements. For example, when typing the character "<" you will see a list of language elements that can or should be used in each section of your EvaML document. In the same way, when entering an attribute, a list with the options for each attribute will also be presented. When there is an error in the structure of the document or there is a typing error that compromises the good formation of the document, the IDE tries to indicate, as precisely as possible, where in the document the error is found. It usually does this by underlining the place where the error is occurring in red.
-
To test the code you wrote, as already mentioned, the EvaSIM simulator will be used, but for that, you need to transform the script code you wrote into a code compatible with the simulator. This process is done using the EvaML parser. To access the command line create a new "terminal" in VSCode through the "Terminal" menu or through the shortcut (Ctrl+Shift+'). A terminal will open at the bottom of the IDE and it will already be in the working directory, that is, in the directory referring to the "eva_sim" folder. To run the code parser, type in the terminal the command "python eva_parser.py my_script_file.xml -c". If your code is in the standard of the EvaML language, you will see in the terminal, the indication that the 4 parsing steps executed correctly and the parsing will have created the file "script01_EvaML.xml". This is the file that must be imported into EvaSIM in the next step.
-
During the step of setting up the proper environment (as suggested) you must have downloaded and run the EvaSIM simulator. You must also have activated the simulator by clicking the "PowerOn" button in the simulator's button menu. In order for the simulator to execute the code generated by parsing, you need to import it into EvaSIM. To do so, you must click on the "Import File" button in the simulator's buttons menu and select the file "script01_EvaML.xml" through the file opening dialog window.
-
The next step is to run the script loaded in EvaSIM's memory and this must be done by clicking on the "Run" button on the simulator. While running the script, watch the messages in the EvaSIM terminal emulator, they can help you in checking your script's logic. Also follow the memory tables, which are on the right in the simulator interface, in which you can visualize the contents of the EvaSIM memory. The simulator was programmed to issue some warning and error messages at runtime. If there is a problem in the execution of your code, go back to VSCode and try to correct it, saving it and returning to the parsing, importing and script execution processes again.
You must download and install the Visual Studio Code IDE from this address: https://code.visualstudio.com/.
The EvaML language is an XML-based language and requires proper formatting of its structure, elements and attributes. The use of VSCode with the Red Hat plugin that supports XML-based languages is an essential support tool for the correct development of tasks.
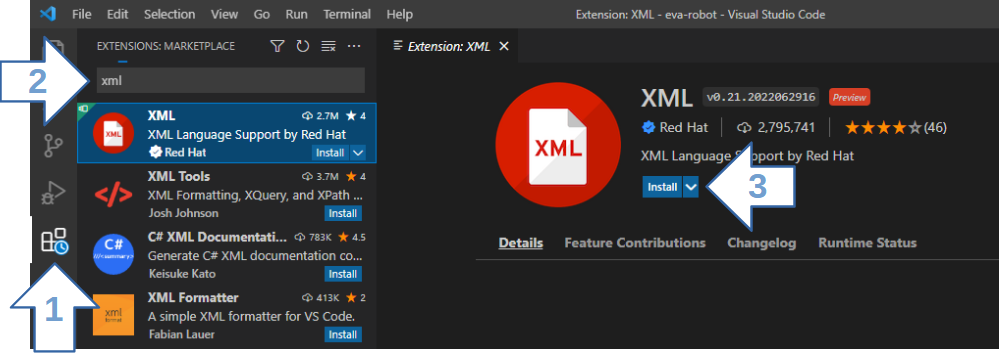
The installation is very simple! Figure 2, through the numbered arrows, indicates the VSCode interface elements that must be accessed during the XML plugin installation process. To start the installation, open the "Extensions" view by clicking on the "Extensions" (1) in the activity bar on the left side of VSCode or using the keyboard shortcut (Ctrl+Shift+ X). You will see a list of the most popular VSCode extensions on the VSCode Marketplace. In the search bar (2), type XML Language Support by Red Hat. To install the extension, select it from the list and click the Install button (3).
From this moment on, the VSCode will support the language coding based on the basic rules of the XML language and also based on the XML Schema file that defines the grammar of the EvaML language. You will be supported in the definition of the document structure, correct use of the elements available in each section of the document and you will be able to use the VSCode autocomplete feature through the keyboard shortcut (Ctrl+Spacebar) when entering commands and language attributes .
The EvaML language is a language for developing interactive sessions for the robot EVA. As it is not possible at this moment to have a physical robot assembled for the language tests, the code written in EvaML will be tested using the EVA robot simulator called EvaSIM. EvaSIM, like the physical robot, does not directly execute code written in the EvaML language, the simulator is capable of executing the code resulting from the parser process of the EvaML language. The language parser code can be found in the "eva_parser.py" file.
As stated earlier, the EvaSIM simulator is capable of executing the code resulting from the EvaML parser process and it is this code that must be imported and executed in the simulator.
To access the EvaSIM simulator and the EvaML parser, download the zip file in the correct version for your operating system from this link. You will be directed to a page containing the EvaSIM instructions.
To run the EvaML parser you need to have Python installed on your machine along with the xmlschema module. To do so, follow the steps described below:
* On Ubuntu Linux, Python is already installed by default and you only need to install its package manager. To do this, type in your Linux terminal the following command with administrator permissions: apt install python3-pip.
In order for the experience in the task development process to be the best possible, a sequence of steps will be presented below that can serve as a guide for the execution of the tasks. We will assume that you already have the development environment correctly configured as indicated above.
Following the tips indicated so far, you will be able to perform the tasks proposed below. Good luck!
Task 1
Develop a session for the robot EVA that makes it present itself to the user. This session must use light and sound elements, must use the robot's display to express its emotions through eyes, and must utilize the robot's Text-To-Speech (TTS) feature, allowing the robot to speak. Mark the time it will take to perform this task.
First, define the name of the script through the name attribute of the <evaml> element. You can keep the same name that came inside the template. Then you must set the robot voice using the <voice> command. To access some of the available voice options, refer to Table 2.3 in Section 2.3.1 of the manual. Make sure to turn on light and audio effects in the <settings> section. The sequence of actions to be performed by the robot is as follows.
Using the <evaEmotion> command, make the robot look neutral. With the command <light>, make the robot turn on the white light. Go to the “sonidos” folder, which is located in the EvaML parser directory and choose an audio file to be played by the robot. Using the <audio> command, play the chosen audio file as an opening sound, before the robot presentation text. Remember to use the block="true" attribute to make the following command wait for the audio file to finish playing.
Now, the robot must turn on the yellow light and have the expression of happiness. Then the robot must present itself by speaking a text. This text must contain 3 distinct sentences, which will be randomly selected at each execution of the script. To do this, use the character “/” as a sentence separator. Now, turn on the pink light, make the robot look neutral and finish the script, making the interaction pause for 2 seconds, for that, use the command <wait>. Save the script, run the EvaML parser, import and run the code in the EvaSIM simulator. Be aware that the name attribute of the <evaml> root element of the template file is “script01”, therefore, after executing the parser, the file “script01_EvaML.xml” will be generated and this is the file that must be imported into the simulator. If the script does not run as intended on EvaSIM, review your XML code to resolve any issues. Save the final XML code for task 1, as you will need to use it for task 2. Remember to mark the time it will take to complete this task.
Task 2
Continuing with the script created in task 1, the objective of task 2 is to make the robot interact with the user via voice to obtain his/her name and ask him/her if he/she wants to play a game. Mark the time it will take to perform this task.
First, the robot must get the username. For this he must ask the question by speaking and then get the answer from the user. Then, the robot must greet the user by the name obtained earlier and say that it will present its emotions. The robot must present its emotions with its eyes, followed by a verbal description of the emotion presented. Present the 3 emotions (happiness, sadness and anger). After the presentation of the 3 emotions, make the robot look neutral.
We will, still in this task, introduce the Imitation Game, a Serious Game that uses EVA's ability to recognize facial expressions. This game will be implemented in task 3.
Following the coding of the sequence of actions, the robot must ask the user if he/she wants to play the Imitation Game. The answer must be "yes" or "no". Get the user's response. Using the <switch var=”$”> command, enter two <case> commands to handle the user's yes/no responses. If the user answers "yes", the robot must express a look of happiness and speak a phrase of enthusiasm because the user has agreed to play the game. If the user says "no", make the robot express a look of sadness saying goodbye to the user, saying a sentence regretting what happened and turning off the light. After the speech, still in the <case> block, which handles the answer "no", insert the command that stops the script execution. You can close the <switch> block, save the code and run the EvaML parser and run in the EvaSIM simulator. If everything is ok, you can move on to task 3, otherwise, review your XML code to resolve any issues. Save the final XML code for task 2, as you will need to use it for task 3. Remember to mark the time it will take to complete this task.
Note 1: To better understand the use of the $ character, see Section 2.3.4 of the manual and look at Figure 2.2.
Note 2: In EvaSIM, use the terminal emulator to track the actions being performed by the “robot”, and check the variable tables to check the return values of the <random> and <listen> commands that can be referenced using the $ character.
Task 3
The last task implements the Imitation Game. The game should work as follows. The robot must explain to the user that it will show some emotions. In all, there will be 3 emotions displayed (sadness, happiness or anger) and they must be displayed randomly. For the emotions of sadness, happiness, and anger, turn on the bulb in blue, green and red color, respectively. Then the robot must ask the user to imitate it. The robot must then detect the user's facial expression and verify that the user was able to imitate it. This process must be repeated 3 times and, at the end, the robot must say how many times the user has imitated its facial expression correctly. Mark the time it will take to perform this task.
To detect the user's facial expression, use the command <userEmotion>. If the user has imitated correctly, the robot must express happiness, say a phrase of congratulations and a point must be added to the score of the game. In case the user cannot imitate the robot, the EVA must express sadness and speak a sentence saying that the user made a mistake. Then the robot restarts the process, presenting another randomly selected emotion. In all, 3 emotions must be presented, that is, the process is repeated 3 times. After the 3 rounds of emotions, the robot must express happiness, present (speaking) the score of the game and finally, say a text saying goodbye to the user. The user's name, obtained in task 2, must be mentioned in the text. For that use the character $ followed by the index that can access the second element stored in the EVA memory.
Note that two variables must be created, the first one must contain the score of the game. The second must control the number of game rounds. Watch out for code snippets that can be repeated in the 3 random streams. You can define some macros that can, in addition to reducing the amount of code typed, make the script more readable. The underlined parts of the text indicate the sequences of actions that can be defined in 3 macros.
After the task is finished coding in XML, run the EvaML parser, import the code into the EvaSIM simulator and verify that the code behaves as expected. If the script does not run as intended on EvaSIM, review your XML code to resolve any issues. Save the final XML code from task 3 as you will need to upload this code later. Remember to mark the time it will take to perform this task.
Note 3: The file that must be uploaded is the file "my_script_file.xml".
Evaluation Questionnaire
After completing the 3 tasks, answer the questionnaire about the EvaML language and the EvaSIM simulator available at: EvaML and EvaSIM - Usability Test
Thank you so much for participating in the experiment!